*disclaimer* this is my first time using Mod Podge, and I'm probably doing it wrong. So bear with me, and if you know the real way to use this stuff, do it that way!
We finally moved into our own place, so I have a room for Monkey I get to decorate! Yay! One of the hardest things being pregnant and not having a name or bedroom for the baby was not being able to make cute personalized things. But now he has a name and a room, so the first order of business is these letters, so I can put his name on his wall!
So, here's all the stuff you need:
Mod Podge (I used gloss, but matte works just as well), paint (I used plain ol' acrylic), cardboard letters (I got mine at Hobby Lobby for about $2.30 each), and scrapbook paper of your choice. And of course, a paintbrush, pencil, and scissors.
First, pick your paper. I used a different color for each letter. Turn the sheet of paper over and trace the letter (which should be facing right side down) on the back. Once you're done with that, cut out the letter.
Next you're going to paint the sides of the cardboard letter. You can paint it, like I did, or you can go super fancy and put paper on those as well (*cough* overachiever). I was feeling lazy, so I did it this way.
While you're painting don't worry too much if you go outside the "lines." You should probably overlap to the front anyway, just in case your paper doesn't exactly match up. No judgement, it happens to the best of us. Or maybe not, but it makes me feel better about being so sloppy.
Let the paint dry, and then add another coat if you need to. My letters needed about 3 coats each. Once that is completed and dry, it's time to stick the paper to the letter (yippee!). Using your (clean) paintbrush, apply a decent amount of Mod Podge to the letter.
Let it dry just enough so it gets tacky (sticky). If you don't wait until it's tacky, your paper will likely bubble up during the final stages. So unless you're really into bubbly paper (which is nothing like plastic bubble wrap, that heavenly delight), you might not want to skip that step. While you're waiting, apply more Mod Podge to the back of the paper letter you cut out.
Carefully position the paper letter on the cardboard. Now you'll need to smooth out the paper. I used a thin box that was laying around, because I'm cool like that. There are special tools you can use for projects like this, like this brayer and squeegee from Michael's, but I didn't have one on hand. Remember to pay extra attention to the corners and sides, pressing them down (especially if the paper overlaps the edge of the board).
Give this 10-15 minutes to dry. Now, you can leave it just like this, or you can Mod Podge over the top and sides again to seal it in better and give it a nice finish. Just brush a thin layer of Mod Podge on the surface using smooth, even brush strokes.
Let it dry (about 10-15 minutes), and you're done! These are light enough that you can hang them with some strong tape. Or you can place them on a shelf. Whatever floats your boat.
No, my son's name is not Ages. Fooled, ya, didn't I?
Here's a close-up of one of the letters so you can see the glossy finish. Ooo-ahhh.
If you decide to give this one a try, best of luck! If you have any advice or pointers for me, I'd be happy to hear them...I am still learning, after all!
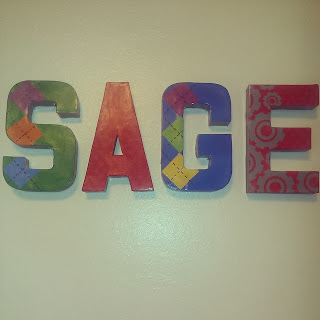
Update: I decided after a month or so that I didn't like the colors I had chosen for monkey's name, so I switched out some of the paper and added more paper to the sides instead of paint. Here is what it looks like now:
I used a paint pen and paper squares to make the argyle-style design on the "s" and "g." I also did some coordinating letters on foam board for the opposite wall:
I'm planning on making a bed set and a couple canvas wall art pieces for his room as well, stay tuned!


No comments:
Post a Comment